What is the advantage to use Amazon SES for SMTP Service.
we have an SMTP service called Amazon SES (simple email services). Amazon being such a big company is able to give us the cheapest email SMTP service in the world. Amazon SES is super affordable.
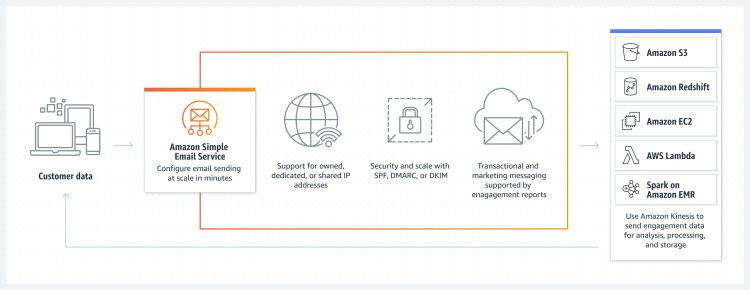
What is Amazon SES ?
Amazon SES is known as Simple Email Service by Amazon. It is an email platform that provides an easy, cost-effective way for you to send and receive email using your own email addresses and domains.
You must deal with infrastructure challenges such as email server management, network configuration, and IP address reputation. Additionally, many third-party email solutions require contract and price negotiations, as well as significant up-front costs.
What is AWS SMTP service ?
AWS SMTP service is Known as Simple Mail Transfer Protocol interface, or using the API. SMTP is used to send and receive email, which handles the retrieval of messages, while SMTP primarily sends messages to a server for forwarding.
SMTP email server will have an address that can be set by the mail to client or application that you are using and it is generally formatted as smtp.serveraddress.com.
For example, the SMTP server Gmail uses is smtp.gmail.com.
When you set up Amazon SES, you will be able to connect your Amazon SMTP credentials (username and password) with to send and track unlimited emails.

How To Configure Amazon SES?
First thing that you need to do is just to make a google search to search for Amazon SES. You will get Amazon SES link. Click on it and sign up if you don’t have an account or sign in to the console.
Amazon SES
It is important to know that you need a domain name (e.g.- www.google.com) to go with Amazon SES. So, whenever you want to build an SMTP server or want to use an SMTP service you need a domain name.
If you don’t have a domain, get a domain (Cost 10$-15$/Year) from Namecheap, GoDaddy, Hostinger, or any other domain provider you want.
Pro Tip: If you’re going to send a lot of cold emails, I’d recommend buying a new domain similar to the website domain name. We’re doing this to avoid your primary domain from ever getting blacklisted or penalized if something goes wrong. If you have a domain like xyz.com, then you might choose a new domain like xyzservice.com.
In this article, we’ll take the example of GoDaddy to explain the whole setup, but it works nearly the same for any hosting provider.
To use Amazon Web Services-
Create an AWS account if you don’t have an account with your amazon’s account first name, last name, a password and your credit card information.
Amazon SES sign up
Then, click on My Account and it will take you to the AWS management console to sign in.
Amazon SES sign in
Enter your password and log in.
How to Use Amazon SES as your SMTP service
Go to services and search for SES and you will be able to find amazon simple email service.
Search SES
As you can see we have already got two of domains connected with Amazon SES below and they are already been verified. This is where you set up DKIM, DMARC, SPF and other few records in order to ensure that the emails that you’re sending it has been verified by these domains.
Domains Set Up
Click on Amazon Simple Email Service to open the Account dashboard. As you can see below we can send 50,000 emails per day and the reason we have this credit is because we’ve requested amazon to increase our daily sending limit when we created a new account.
Remember if you change the region then it will take you as a new account and your daily sending limit will change. Amazon SES emails limit
How can you connect your domain with Amazon SES?
Then, add your domain to SES. So simply click on domains from the left bar and click Verify a New Domain.
Verify Identity
Create a verified identity and you need to drop the domain. There are two ways you can verify the identity, one is by email address that send all the emails from xyz.com. Another way is to use this domain in all kind of emails that you will send. The username can be different and it can be added xyz.com. For instance it can be johnxyz.com. So choose domain because you can choose the username according to your need.
Create Identity
Enter your domain. Let’s say your domain is sendmail.io
sendmail.io
Now click on use a custom mail from domain.
Use a custom email
Then write one subdomains text in MAIL From domain that you are gonna configure on our dns record. For instance ses.sendemails.io.
In Advance DKIM settings, choose Easy DKIM and then choose RSA_2048_BIT then just create the identity.
Create Identity
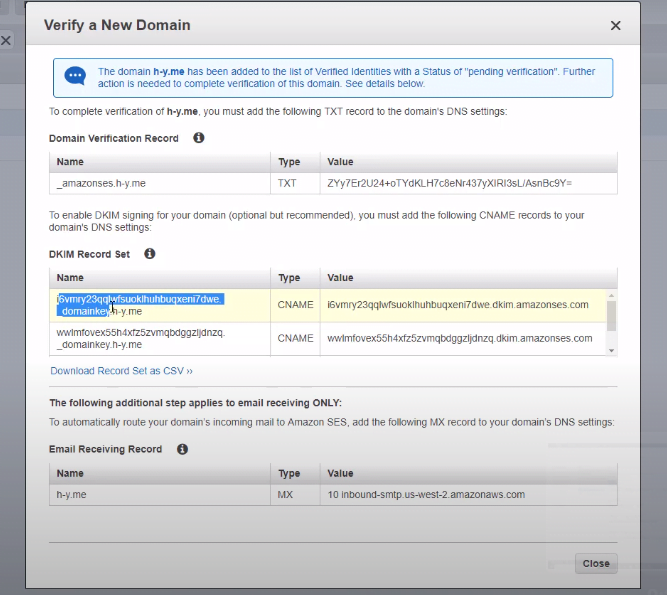
Verify the domain by adding these dns records that you’ve got.
dns records
There are a bunch of other dns records that you need to add from CUSTOM MAIL FROM DOMAIN.
other DNS records
You might have bought your domain from namecheap, hostinger or godaddy. They’ll give you advanced dns configuration system where you can add these records.
How can you find your dns management system on different hosting providers?
Let’s take a look at hostinger. To find your dns, click on Domains and then goto DNS/Nameservers.
How can you find your dns management system on different hosting providers?
Inside Manage DNS records, change the record type to MX, TXT depending on the record you are getting.
Select DNS record type
Go to the DNS Management for your domain. It might look different for different hosting provider (Here’s how you can find DNS Management for Hostinger, Hostingator)
DNS management zone
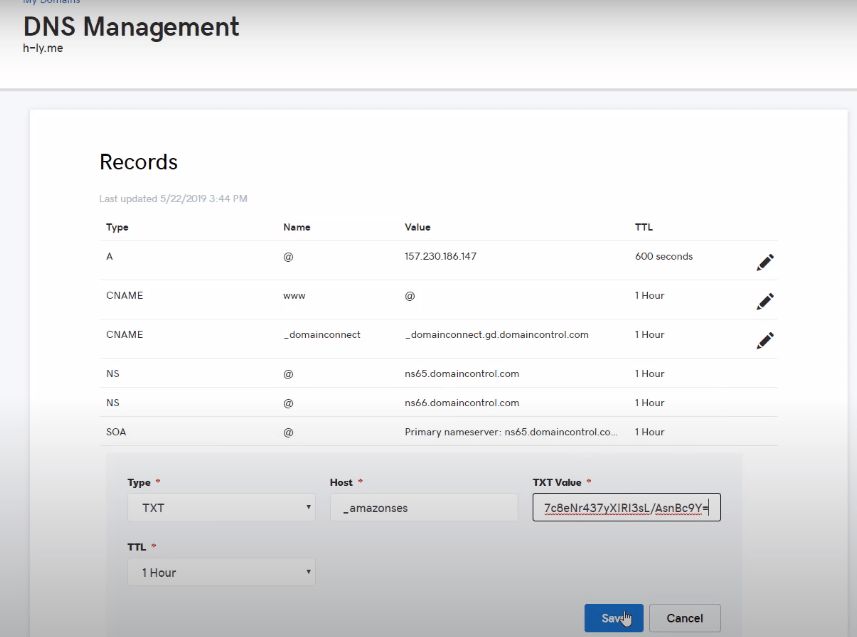
Now In your Amazon SES dashboard, you need to copy these text records.
add this text record
While copying the entry from Name in Amazon SES, don’t copy your domain name (e.g.- If record looks like _amazonses.yourdmain.com, then you’ll only copy _amazonses and leave .yourdmain.com).
Then go back to DNS management, add a text record, paste the hostname.
DNS management
Then copy the text value and paste it in the same way. Let’s copy a DKIM record, so copy everything except the domain name and create a cname record.
DKIM record
Simply say add again now select CNAME and under the hostname CNAME because this type is cname so, just copy this value and paste it in the same way and do this for all.
CNAME Record
You will be able to see three records and if you want to set the MX record also you can select MX. Then MX is the email server record for your domain.
Then click close and your domain will be verified soon.
So, you need to add your domain and wait maybe for 20 minutes or half an hour and AWS or Amazon will verify your domain.
Domain Records
Open The Limit
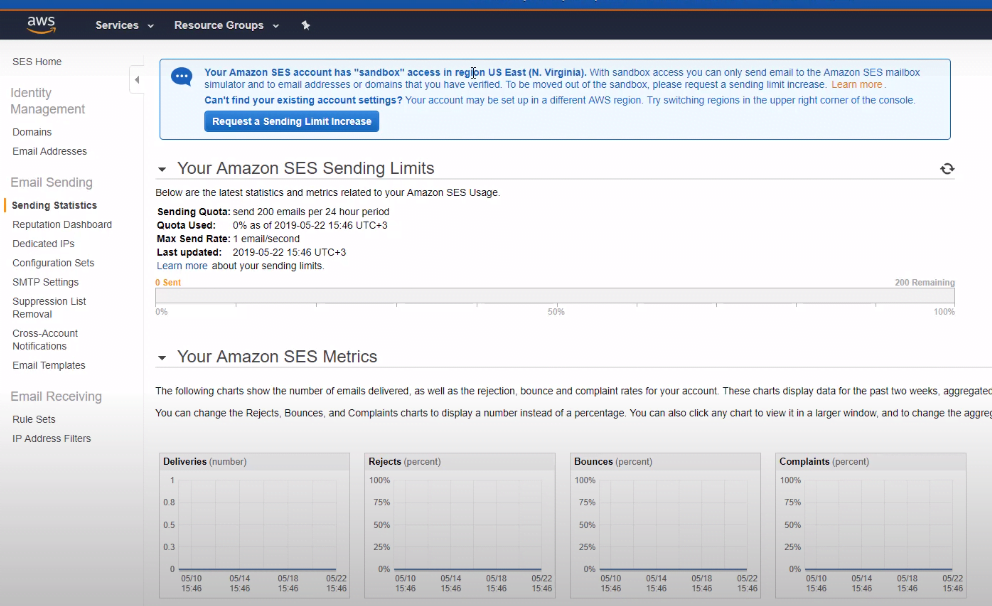
After verifying your domain you will be able to send only verified email addresses here because you will be set in the sandbox.
let’s go to sending statistics and then go to another region (US east) and you’ll notice by default that you are set in the sandbox.
Open The Limit
So, you can only send verified emails and only 200 emails per day.
To unlock this limit simply Request Sending limit Increase by clicking on the button and this page will take you to options where you can select the mail type.
Just fill-up the form for your website and click Submit. Always describe why you want to increase this limit.
Service Limit Increase
Maybe after 24 hours to 48 hours, Amazon will reply and open the limit for you.
You can see it in US West Oregon. I opened the limit so now I can send around 50,000 emails per day. You can see 50 thousand emails remaining.
My Account Limit
So it’s very simple just add your domain, submits a request to open the limit and after 24 hours or 48 hours, Amazon will open the limit for you. You have a limit of 14 emails per second and 50,000 emails per day.
Amazon SES Pricing
Amazon is the cheapest SMTP or email service on this planet. You can send around 1,000 emails for only 0.1 dollars. That is you can send 10,000 emails for one dollar and 100,000 emails for $10.
How do you connect your Amazon SES ?
Click on All Tools.
connect new sender
Set SMTP settings or Credentials
Go to SMTP settings and click create my SMTP credentials.
SMTP settings
Click create here and click show user SMTP credentials.
Then let’s open a notepad as an example to copy these credentials such as username and SMTP password.
SMTP credentials
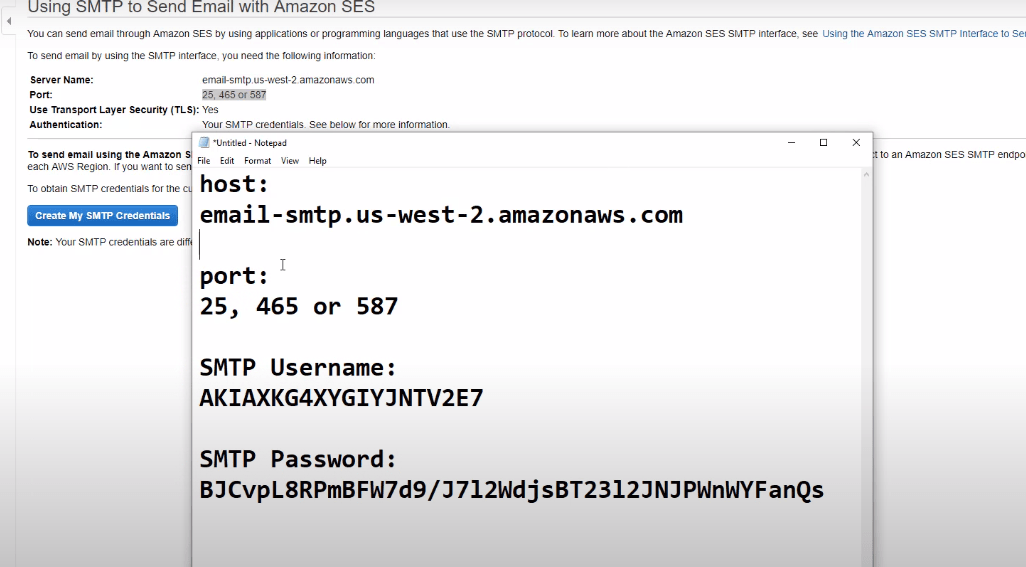
To find the port and the host let’s go back and click on SMTP settings again.
You can see we can use port 25, 465, or 587 and this is our server name so just copy your hostname and you can use this in the configuration.
Save this and you can use it now in CRM to send emails.
1. Login to your Dashboard.
2. Go to CRM > Senders (SMTP) > Connect a SMTP (sender)
How do I use my Gmail account to send emails.Here’s the complete guide on how to send emails using CRM
Check sending statistics
You can see delivery drags, bounces complaints, how many emails you sent per day.
For this go to the reputation dashboard and see your reputation. It’s important to be healthy if you want your emails to go into the inbox folder. If you have a lot of bounce rates then you may be blacklisted or blocked even by Amazon.
sending statistics
Request Production Access in Amazon SES
Here we can choose marketing or transactional emails. Marketing email is something like newsletter that you send or anything to promote your offers updates.
Transactions emails are something like invoices that you raise on account notifications, forgot password or anything like this.
Request Production Access in Amazon SES
Then write Website URL. Amazon SES already knows that you own a domain and it is already verified. Always connect the domain that has got a good website and that has an email collection lead form. This is because you need to tell amazon from where are you collecting those emails even if you don’t want to use that domain to send those emails.
In Use Case Description describe the process through which you’ve collected those emails. For instance,
hi team, I’m looking forward to get approved by amazon SES to send emails because my previous email marketing software was too expensive.
The next thing that you need to take care of is that when you will send the first email. With this form in the website they can reach out to you if they’ve got any question.


